Critical Path Method in Construction: Steps, Examples, and Best Practices

A project schedule isn’t just a list of dates on a calendar but a framework that holds your entire project together.
Scheduling in construction means connecting tasks, dependencies, labor, equipment, and milestones into one clear and logical flow. Thus, any construction project, regardless of the scope, requires a structured approach to the schedule.
When there is a system, it’s easier to understand exactly which activities drive your project timeline and which ones have flexibility. One of the most efficient tools for doing this is the Critical Path Method (CPM).
In my blog article, I will show how the Critical Path Method is used and how it helps builders improve planning and strengthen overall project management workflows.
Table of Contents
- What Is the Critical Path Method in Construction?
- Steps to Apply the Critical Path Method in Construction
- Best Practices for Successful Critical Path Scheduling
- Key Highlights

What Is the Critical Path Method in Construction?
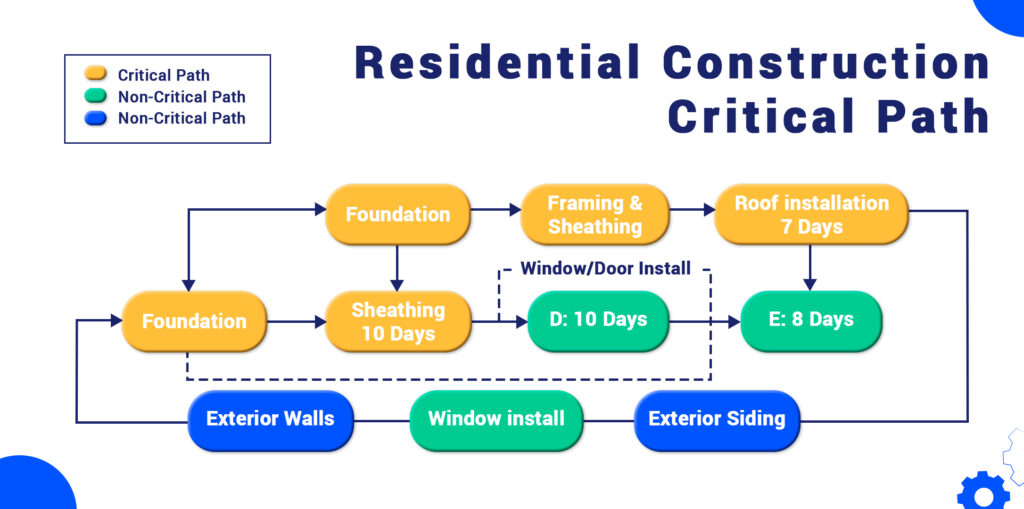
Critical Path Method in construction is a project scheduling technique that helps builders and project managers in construction project planning. At its core, CPM identifies the longest sequence of dependent activities in a project, or the “critical path”. The latter determines the shortest possible time to complete the project.
It’s like a roadmap of the timeline. Every task has its place in the sequence, while some tasks depend on others, and certain activities are critical because any delay in them will push back the entire project. Some flexible tasks can be delayed slightly without a significant impact on the project.
Professional construction organizations, including the Construction Management Association of America (CMAA), also recommend using structured scheduling methods like CPM. In other words, it’s an analytical tool for calculating task relationships.
Key CPM Terms
To truly understand the Critical Path Method, you need to know the core concepts that drive it. First, an activity or task is simply a unit of work that consumes time and resources. In construction, this could be something like pouring the foundation, installing roofing, or completing rough electrical.
Then there are dependencies, which define how tasks relate to one another. A dependency shows which activity must happen before another can start. For instance, framing cannot begin until the foundation has been poured.
There are several types of dependencies:
- finish-to-start, where one task must finish before the next starts
- start-to-start, where two tasks begin simultaneously
- finish-to-finish, where tasks must finish at the same time
- start-to-finish, where one task cannot finish until another begins
Another critical term is float or slack, the amount of time an activity can be delayed without delaying the overall project. There are two types: total float, which affects the project’s end date, and free float, which only affects dependent tasks. Installing windows, for example, might have a couple of days of float if the next activity doesn’t rely on them immediately.
The critical path itself is the sequence of activities with zero float, or tasks that cannot be delayed. Any delay in these tasks pushes the entire schedule back. Tasks on the critical path are called critical activities, while others with float are non-critical activities that offer some scheduling flexibility.
Steps to Apply the Critical Path Method in Construction
When creating a CPM chart, each activity is represented by a grid that displays key information, such as start and finish dates, durations, and float.
You can see exactly how every task fits into the overall project timeline. Let me show a step-by-step overview of this process.
#1 Identify the Tasks
The first step is to determine the tasks required to complete the project or a specific segment. Each task should be clearly defined and measurable, allowing accurate planning and tracking.
For example, when completing the interior of an office building, tasks might include:
- framing exterior walls
- framing the roof
- installing windows and doors
- completing rough electrical work, installing insulation
- finishing with drywall
#2 Determine Task Dependencies and Sequence
A key phase is determining task dependencies and establishing the correct sequence for all activities. Understanding dependencies ensures that each task starts and finishes at the right time, preventing delays and conflicts in the schedule. To do this, ask key questions: what must happen before this task can begin, and what can follow it․
Such an analysis allows you to identify both critical and non-critical relationships. When visualizing the schedule, arrange tasks from left to right to represent the project timeline.
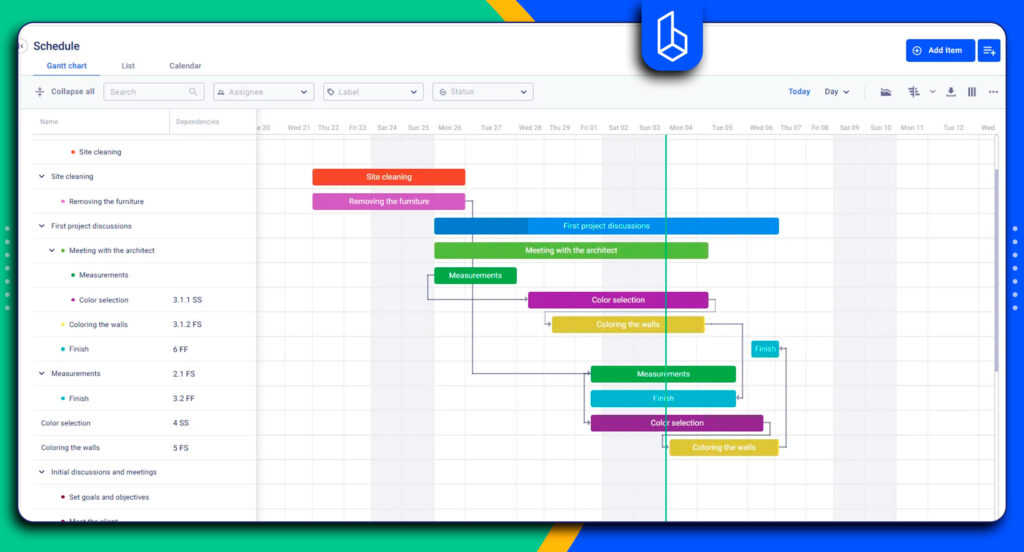
Tasks that can occur simultaneously should be stacked vertically, providing a clear picture of overlapping work. I use our construction management software to visualize the tasks, which is also a perfect way to show the client and subcontractors where each task stands.
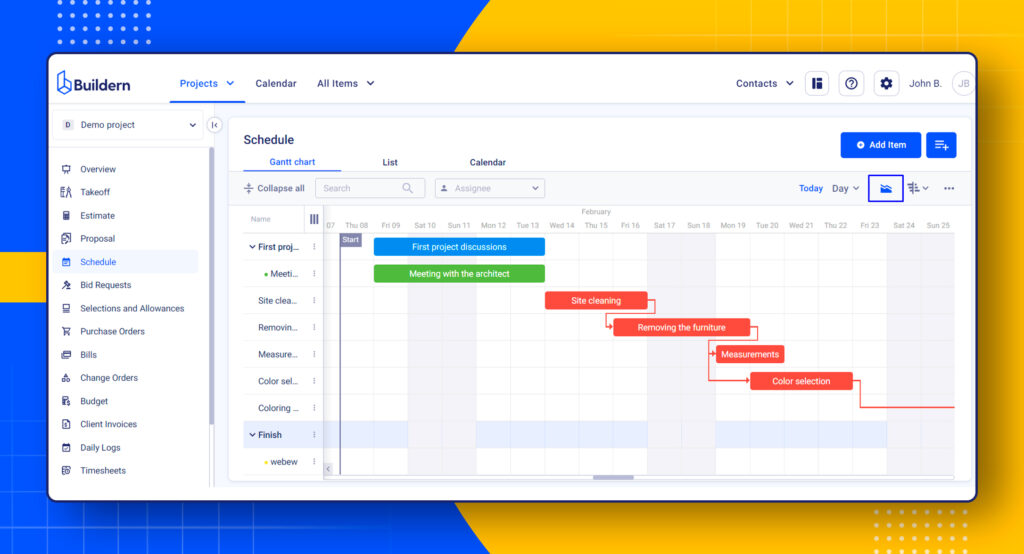
In this case, all tasks are added directly into the construction schedule, where each activity is displayed as a visual item on the Gantt chart. It’s a visual timeline that shows all your project tasks, their start and finish dates, durations, and how they overlap.
A Gantt chart can display the critical path visually, but it’s important to remember that the chart is a visualization tool, not the calculation method itself.
#3 Estimate Activity Durations
Assessment of activity durations is a crucial step for creating an accurate and reliable project schedule. Assigning realistic durations ensures that tasks are planned according to the time they are likely to take.
Durations should be based on historical data from similar projects, expert judgment from experienced team members, and other facts such as material availability.
It is important to maintain consistent units across all tasks, typically in days or weeks, and to be as detailed as possible. For example, framing exterior walls may take 10 working days, while installing insulation could take three days.

#4 Perform the Forward and Backward Passes
These are the phases where the actual calculation of schedule details takes place. The forward pass moves from left to right, calculating the earliest times activities can begin based on when their predecessors finish.
For example, if framing exterior walls can start on day 10 and takes five days, its earliest finish is day 15.
The backward pass works in the opposite direction, from right to left, finding the latest times tasks can start or finish without delaying the project.
If drywall must be completed by day 29 and takes six days, its latest start is day 24. This means insulation, windows, and doors, and the roof membrane must all be finished by day 23.
This simple forward-then-backward logic makes it easy to see how each task affects the overall timeline.
#6 Calculate Float and Critical Path
Float represents the amount of time a task can be delayed without affecting the schedule. It’s one of the most valuable insights of the Critical Path Method in construction. It helps project managers understand which activities have flexibility and which do not.
Total float is found by comparing the earliest and latest dates.
If a task’s earliest start is day 10 and its latest start is day 12, it has two days of float. This means it can shift slightly without impacting the final project completion date.
Free float is a more specific measure as it shows how long a task can be delayed without affecting the start of the next dependent activity.
Best Practices for Successful Critical Path Scheduling
Even with a well-structured schedule, the real challenge is to keep it accurate, realistic, and responsive to changes in the field. I am offering some practices to help you create a CPM schedule so as not to face common problems.
Use Templates for Recurring Project Types
Templates are a builder’s secret weapon when it comes to efficiency and consistency. For projects of similar scope or type, a well-designed template helps in terms of time management.
Templates can include dependencies and even estimated durations based on past projects, which reduces the risk of missing critical steps. This approach ensures that even new team members can quickly understand the workflow.
Maintain an Updated Historical Productivity Database
Historical data is one of the most powerful tools a builder can have. Tracking how long tasks actually took in previous projects allows you to make realistic estimates for new work.
Over time, it becomes a living record that improves accuracy and helps identify trends or recurring delays. It’s an efficient tool for scheduling as it allows a contractor to justify timelines to clients or stakeholders with solid evidence.
Track Field Progress Daily
By monitoring progress daily, you ensure that your plan reflects reality, not assumptions. Daily tracking helps you spot delays early and take corrective action before small issues become major problems. It also allows project managers to adjust resources and reschedule dependent tasks quickly.
In short, daily monitoring turns your schedule into a living tool rather than a static document.
Use Software for Real-Time Updates
Scheduler in construction meets constant changes, while using scheduling software simplifies and makes the processes faster. It centralizes all project data, automatically updating task durations, dependencies, and progress as modifications occur.
Many software tools integrate Gantt charts with critical path calculations, allowing project managers to visualize which tasks drive completion and which have flexibility. This visual overlay turns the critical path into an interactive picture.
Key Highlights
- The Critical Path Method (CPM) helps builders understand which tasks directly control the project’s finish date.
- It shows the longest chain of activities and points out where delays are acceptable and where they are not.
- To use CPM, you list all tasks, define how they connect, estimate how long they will take, and calculate their earliest and latest possible dates.
- Keeping schedules accurate requires updated data, daily progress checks, and tools that adjust the plan in real time.