Construction Project Planning: A Step-by-Step Guide for General Contractors

What happens after a general contractor meets a client who wants a house of his dreams? A builder starts planning.
The first crucial step is project planning, which is both time-consuming and requires a high level of skill. This phase begins well before proposals are sent, contracts are signed, or any physical work begins.
In this guide, we’ll break down the planning process step-by-step and figure out how construction management software tools help in creating a realistic and flexible plan.
Table of Contents
- Preconstruction Kickoff
- Construction Budget Planning
- Sending Bid Requests
- Creating an Accurate Project Estimate
- Preparing a Proposal
- Risk Management in Construction Project Planning

Step 1: Preconstruction Kickoff
The first step in the construction project planning is a meeting with the client and the design team. This is the exact time when the builder gets a task in terms of the project’s goals, scope, and feasibility.
A home or a commercial project owner shares the vision about what the building is and what approximate budget boundaries exist.
This phase also lays the groundwork for defining the project scope. The size, layout, preferred materials, and whether a feasibility study is completed. The contractor needs to understand these aspects beforehand. Early collaboration with architects, engineers, and even suppliers helps avoid costly changes later on. At this stage, using preconstruction software tools may be helpful to start planning wisely.
Who’s Involved in Initial Planning?
Construction planning is a team effort. Several key players are involved from the start. The client or homeowner sets the vision, goals, and budget for the project. Meanwhile, the architects and engineers develop designs and technical specifications for the future project.
The project may also involve consultants who provide solutions to structural, environmental, legal, or geotechnical issues.
The architect provides the builder with documents for him to start working on the estimate. The document may include:
- Foundation plan: It’s a detailed plan of how the building’s base structure will look. It includes the slabs, piers, foundation walls, and dimensions of the structural support plan.
- Floor plan: a horizontal layout of the house from above. It includes walls, doors, room dimensions, etc.
- Project blueprints and drawings: This is a detailed plan that consists of the floor plan, foundation plan, elevations, roof plan, electrical layouts, and more.
Step 2: Construction Budget Planning
A well-prepared construction budget includes different types of costs. Planning the budget with attention to detail helps avoid costly surprises. According to the National Association of Home Builders, the average construction cost of a new single-family home was $428,215 last year. With numbers like these, even small budget miscalculations can lead to significant overruns.
Planning the budget means taking into account:
- Material costs: Measuring the costs and quantity of all materials required for the project.
- Labor costs: Calculating the wages of office personnel (e.g., a project manager), in-house workers, or subcontractors involved in the project.
- Equipment costs: The amount required for buying or renting equipment.
- Overhead costs: The indirect costs not associated with physical construction activities, such as insurance, permits, site security, etc.
The budget planning is to break down costs by phase, scope, and trade. Here, the contractor needs to use both historical data and real-time bids from subcontractors to make wise decisions. There are two options: either to do this manually or to use budgeting software for further accuracy.
Step 3: Sending Bid Requests
The key part of construction project planning is sending bids to get clear information on the actual market cost of specialized labor and materials.
Outdated pricing or rough assumptions may ruin the estimate. It is important to send bid requests early to gather pricing and scope details from vendors and subcontractors. Even remodeling a kitchen may include dozens of units. Imagine the difficulty of getting quotes manually when it comes to an entire house.
It was a common practice to send bid requests via email or get information simply by calling multiple vendors and subcontractors. The main risks here are miscommunication or losing some crucial details along the way.
Meanwhile, bid requests in the construction management software platform offer all information stored in one place. A bid request form includes all details: cost item, maximum unit price, maximum total price, files with a visual if necessary, etc.
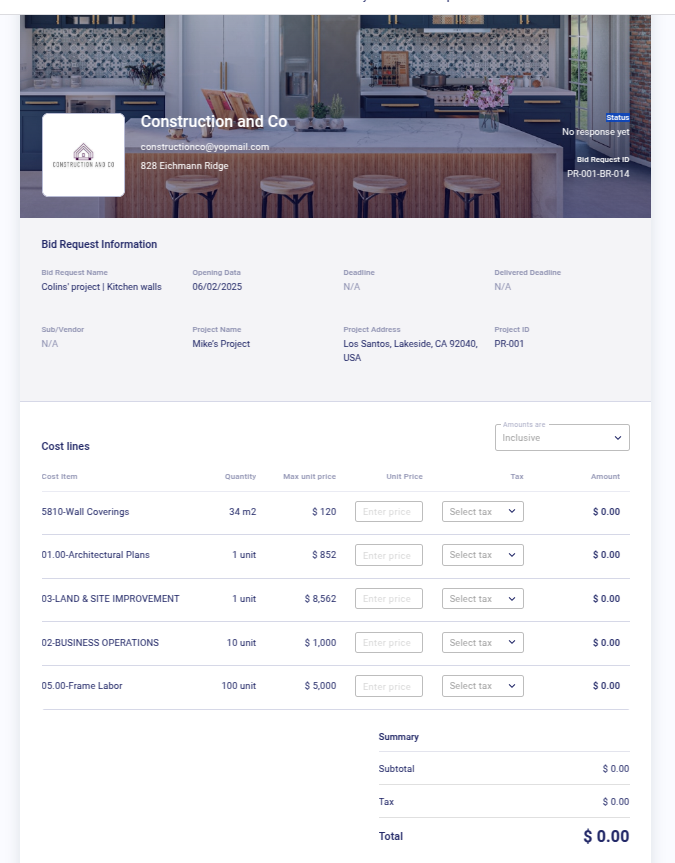
The subs or vendors receive an email without the need to log into the system. When answering the request, a sub/vendor is free to submit it filling in the price, adding comments, and signing the form electronically.
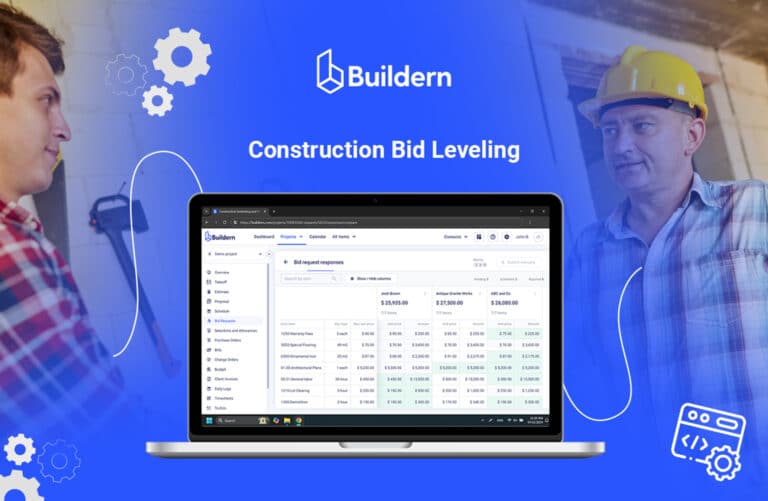
Bid Leveling
Once a contractor gets information from a sub or a vendor, it’s time to choose the best offer. Of course, this can be done manually. However, software platforms can help with automatically organizing responses in a structured format
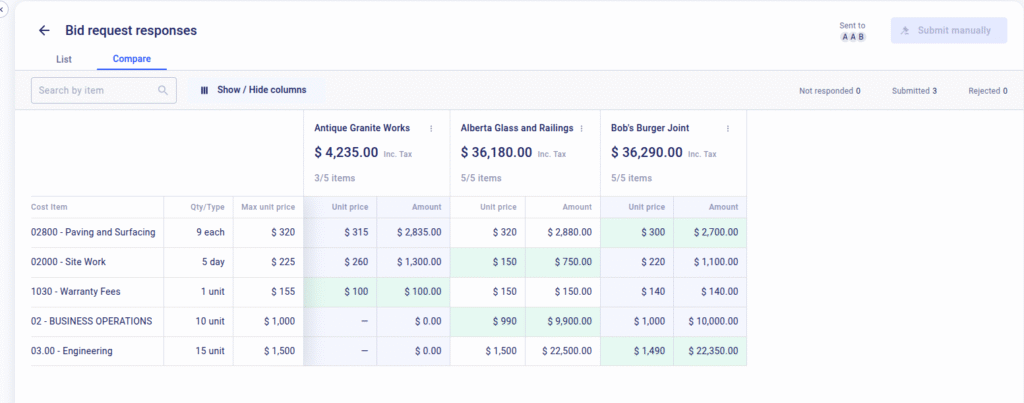
The system highlights cost differences per the same quantity of units, or per days and hours, when it comes to labor cost. The result is that the contractor has a clear, organized table. By the way, this can be later used to form a purchase order in a few clicks.

Step 4: Creating an Accurate Project Estimate
Before making a solid proposal to the homeowner, the contractor has to calculate the costs. This includes the costs of materials, labor, and equipment.
Traditionally, contractors relied on handwritten notes and rough calculations. Later came spreadsheets, which were a step ahead, but still time-consuming.
Unlike traditional methods, software estimating tools make the job much easier. Such tools pull in material costs, automatically apply markups, and help a contractor avoid underpricing or missed items.
But before an estimate can take shape, it all starts with the takeoff or a quantity takeoff.
Performing the Takeoff
A construction takeoff is a method used to calculate the types and quantities of materials needed for a project. Any type of material, from wood and bricks, down to the nail, is important.
The takeoffs rely on 4 key measurement types:
- Count: This measures the number of items used during the project, such as nails or bolts.
- Length: Measurement of lumber, pipes, or cables.
- Area: Calculation of the materials for an area, for example, measuring of paint for a surface.
- Volume: This measures the length, width, and depth, which is important as it is affected by the shape of the room or the roof.
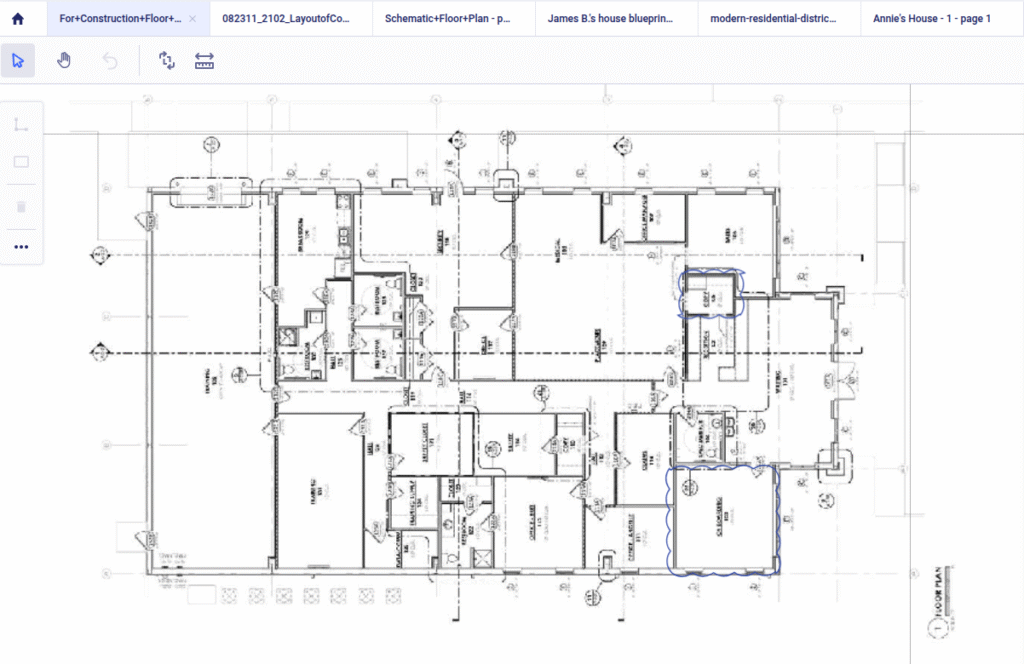
Digital Takeoff
The manual approach to takeoff means entering all the items into a spreadsheet and calculating by using complex mathematical equations. There are also such factors as height, weight, and thickness of the materials to be considered.
Meanwhile, a digital takeoff allows for measuring the length and areas with just a few clicks. With Buildern, the contractor can upload a blueprint and scale it. The tools let you choose from various measurement types. Each can be named, categorized, and even assigned a waste percentage to reflect conditions.

Besides, each measurement may appear visually. The tool adjusts colors and line types to make a plan easy to read for the client. The platform even enables the user to calculate material wastage before starting the job.
The biggest advantage? Speed and accuracy. Instead of spending hours manually cross-checking measurements and costs, you get a breakdown in minutes.
Adding Labor Costs to the Estimate
The material takeoff is complete, and the next key component of a construction project planning is calculating the labor costs. In the case of Buildern, the takeoff data is transferred into the estimate, so it’s easier to determine the wages of workers. The wages are measured automatically based on the scope of work calculated in the takeoff.
Labor Cost Types
There are different ways to estimate labor costs in construction. For example, with detailed estimating, the contractor can break down every task and assign actual hours and burdened rates. Meanwhile, the unit rate assigns a labor cost per unit (like per square foot). The percentage rate is about using historical data to calculate the average labor cost.
Buildern simplifies this process with built-in labor cost adding. The estimate includes labor units, and it’s up to a user to customize and choose the duration of work (hour or day) as a unit.
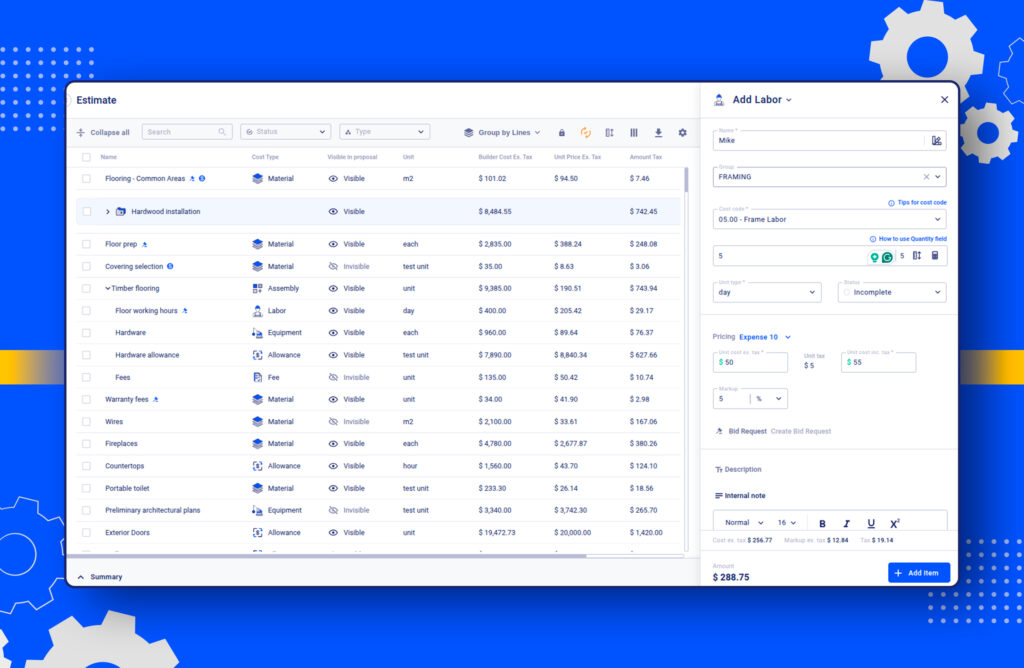
When the unit is set, input the rate, for example $50 per day, and also apply a markup (here it is 5%) to automatically calculate the framing labor cost.
Step 5: Preparing a Proposal
Once all the data is ready, it’s time to send a proposal to the homeowner. Most importantly, it should contain as much detailed information as possible.
Make sure you have a clear and data-backed estimate. It’s better to break down all costs by category, including materials and labor. This gives clients a clearer picture of where their money is going.
Generating a Construction Proposal
Generating a proposal can be done in several ways, depending on the tools the building firm chooses. The manual method of writing a proposal is still popular. For example, a contractor can use Word documents, spreadsheets, or presentation tools.
However, there are some risks associated with manual proposals:
- Multiple Versions: With manual editing of files or emails of the proposal, it’s easy to lose track of the most recent version. This can lead to confusion and duplicated work.
- Human Error: Calculation errors, missing items can appear when copying data from estimates or spreadsheets.
- No Quick Feedback: Manual proposals don’t offer real-time feedback. The emails may be overlooked. You can’t see if a client has viewed the document, making it harder to plan your follow-ups effectively.
Making Proposals Faster
Using construction software to prepare a proposal means making the process faster and more accurate. Once your estimate is finalized, turning it into a proposal takes a few clicks.
All aspects of the construction budget – material costs, labor costs, allowances, and overheads are all in one place. Besides, tools are enabling the user to attach files to show materials along with the costs.
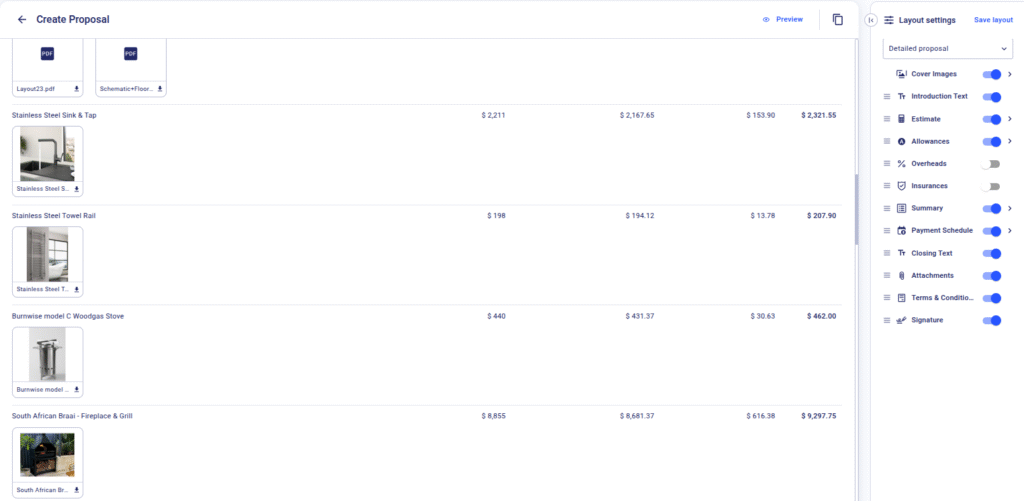
The best part is that it’s not only a presentation, but a legally binding document. A contractor can add an e-signature section where a client signs and approves the proposal.
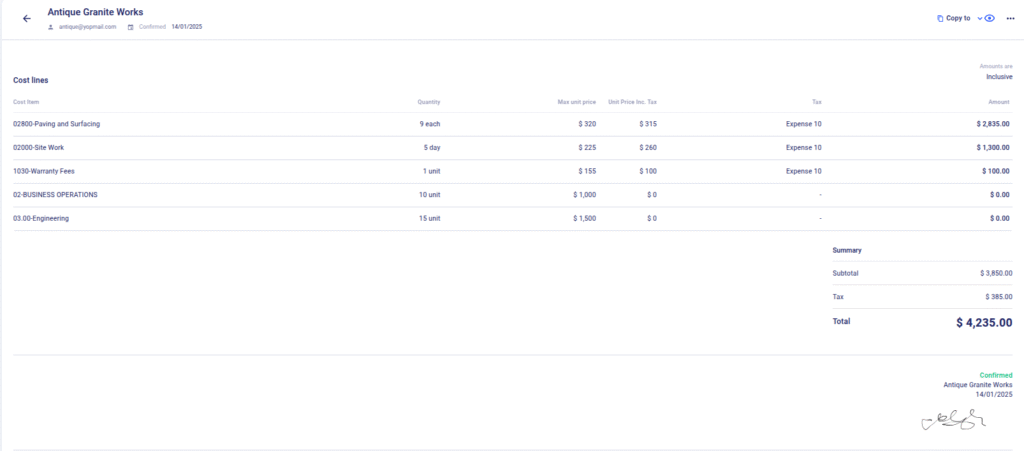
Now the proposal is ready to send to the client. This means a huge part of planning is over for this stage
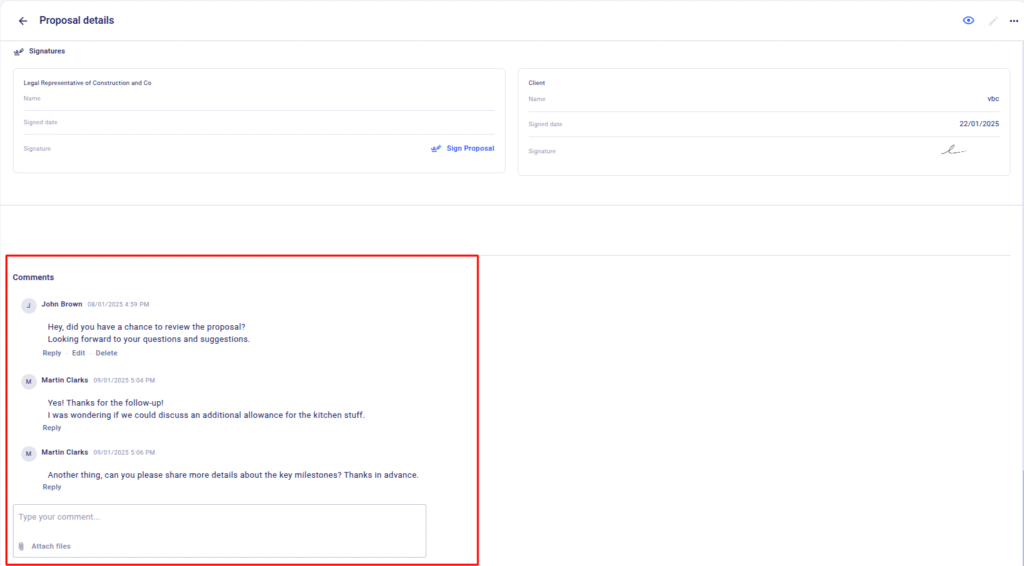
However, communication following the preconstruction stage is also a part of planning. If the contractor uses software, numerous built-in functions address these concerns.
There is no need for different channels as the client receives everything on one platform. For example, a builder can track if the client has received the proposal. Moreover, even if a client emails a reply, it is automatically added to Buildern as a comment.
Decisions are made faster and more efficiently with this approach. This makes decision-making faster and more efficient. The approval cycle is shorter, and the overall experience is more transparent.
Risk Management in Construction Project Planning
Any project planning faces potential risk regardless of the scope. During a construction project, risks may result in overbudgeting and unacceptable delays. That’s why it’s essential to identify potential risks in the planning phase. By doing so, contractors can take proactive steps to reduce their impact.
When we say risks, the first is the safety of workers that comes to mind. Of course, the safety of the crew is the number one priority. However, there are also financial risks that can damage the reputation and business.
Tips to Avoid Common Risks
Software tools help prevent financial and communication risks. Those two are interrelated, as miscommunication may lead to financial losses.
#1. Build realistic schedules: Overly optimistic timelines can lead to conflicts and inaccuracies. Use software to create detailed schedules.
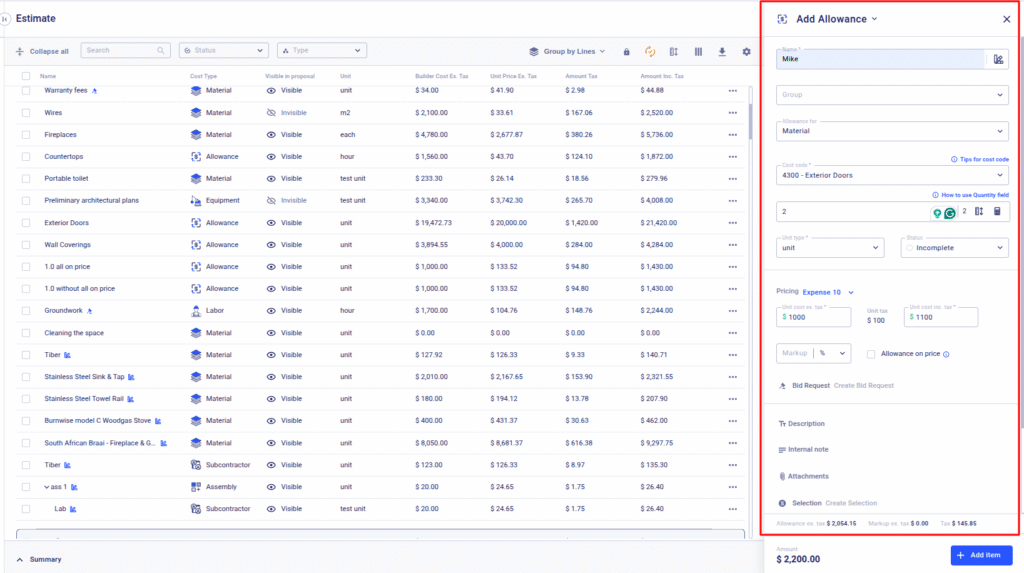
#2. Make accurate calculations: One way to minimize financial risks is to set allowances in the project estimate. This is a flexible price for some services or materials that have yet to be determined.
For example, a contractor plans to install two exterior doors but is not sure which model a client will choose.
An allowance is set at $1,000 per door, based on mid-range options available at local suppliers. If a client selects a door that costs $850, the contractor adjusts the budget, and the client receives a $150 credit per door.
#3. Maintain Strong Communication with Subs and Vendors: Having all tools available to communicate within the platform is another way to reduce risks. A construction management software platform is an all-in-one communication hub. It keeps every conversation related to a specific project or wider company-related issues in one place.
#4. Automate Updates and Files. Modern construction software automates repetitive tasks. Notifications, updates, and RFIs are automated, ensuring no critical task is missed.
Overall, construction planning is a complex task with many stages and nuances. It requires a step-by-step approach and the ability to manage all parts carefully. The more detailed and realistic the plan is, the smoother the construction phase will run.
What is Project Planning in Construction?
Planning is the initial phase that starts before any physical work begins. It involves defining the project scope, estimating costs, identifying risks, and coordinating with all stakeholders.
A well-structured plan covers every aspect, including sending bid requests, creating takeoffs, estimating labor and materials, and preparing a proposal.
What Are the First Steps in Planning a Construction Project?
The first step is to listen carefully. Pay close attention to both the homeowner and the architect to understand the vision, priorities, and potential challenges ahead. It’s also about gathering as much information as possible to avoid costly surprises. Once all this data is collected, the next step is to prepare a detailed estimate.
How Long Does Construction Planning Take?
The duration of planning depends on the project. It’s better to spend additional hours on preparing a clear proposal to minimize risks than to face delays in the future.
How to Perform Pre-Project Planning Risk Management in Construction?
Risk management is all about identifying and addressing potential issues before construction begins. It’s essential to assess which risks are most likely and which could cause the most damage. At a preconstruction stage, this helps general contractors avoid delays, budget overruns, and legal problems.
What Can Help with Project Planning?
Modern construction planning relies heavily on digital tools. Construction management software can take over the entire preconstruction cycle from calculating an estimate to managing communication with clients and vendors. Using software early in the planning phase saves time and reduces the chance of costly mistakes.